Exposed! :: Understanding Blur in your Photos ::
© Copyright 2010. All Rights Reserved.
Contents
"My new camera's not working!"
Recently, I had two separate students approach me with a similar problem. Their photos appeared out of focus and they were questioning their cameras.
With a little detective work I found that theirs was a common misunderstanding. Their "out of focus" photos were actually perfectly in focus but suffered from slight motion blur.
In this edition of Exposed! we'll discover how to use your camera's metadata to help differentiate slight motion blur and slight focus blur.Playing Detective
Looking at the metadata can tell you a lot about what is going on in the photo. When I looked at the photos and metadata stored on the cameras of both students, their "out-of-focus" photos had big apertures like f2.8 and slow shutter speeds of 1/30th of a second which made sense as they were shooting in relatively low light.
I hypothesized their auto-focus systems were working well but their shutters were open for long periods allowing either the camera to move or the subject to move.
The fix in these cases is simple — shoot with a faster shutter speed.
For hand held shooting of many slow moving subjects that means a shutter speed of at least 1/250 or 1/500 (sometimes displayed as 250 or 500). BUT the catch is if you let less light in through faster shutter speeds you need to let more light in another way. That means:
- raising the ISO or
- using a nice big aperture like 1.8 or 1.4 or
- both
The Fundamentals
Understanding your camera's capabilities and the effects you wish - photo fundamentals - to achieve will help you avoid muddy messes and achieve creative success. Below are some photos shot for a stock assignment with notes explaining the creative blur applications used. The last one is a BAD photo I shot in a rush - and did not submit!!
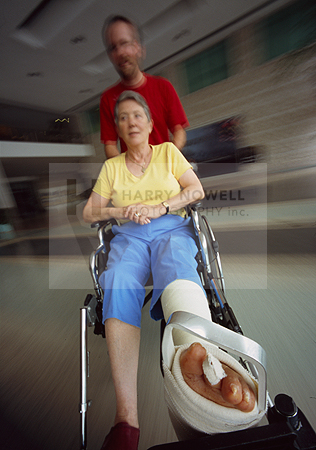
No focus blur, some motion blur. f11, 1/15s
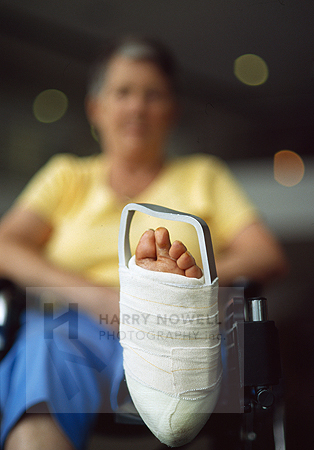
Selective focus blur, no motion blur. f1.8, 1/500s
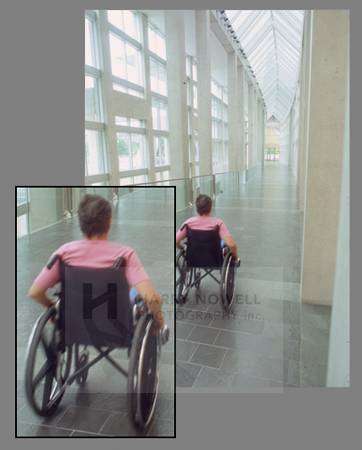
BAD photo!! No focus Blur. Slight motion blur = muddy. Yuck! f11, 1/60s
Hypothesizing
To test my hypothesis, I had one of the students take a photo of me the way he normally does (which for him was on program mode). We were in low light and the camera chose f2.8 and 1/30 resulting in the muddy mess that appeared out of focus to him.
I then suggested he shoot manually, raising the shutter speed and using a bigger iso or larger aperture.
Guess what? The light bulb went off! Magic:
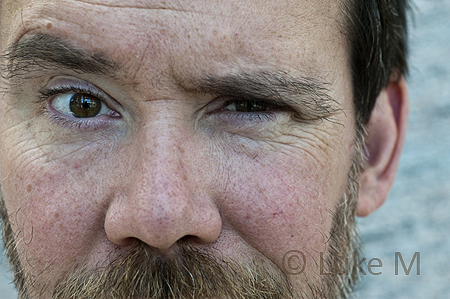
Sharp, crisp portrait by a student!
He got what he wanted - a sharp, crisp, beautiful portrait of a slightly weathered, graying photographer. He was pleased with the breakthrough and we spent the rest of the session working on the fundamentals so that he could control the photo quality he was producing.
Homework
- Eliminate auto exposure modes from your tools.
- Experiment and develop your skills so that you are comfortable in manual exposure mode.
- Shoot, shoot, shoot.
- Critique.
- Learn from mistakes.
- Try to decipher photos around you. Try to figure out how a billboard photo was taken for instance. What shutter speed and aperture were used? Was it taken with flash, under sun, or cloud cover? Try to define as many elements as possible.
Pro Perspective
When shooting anything I have a very good idea of what I want. To achieve that vision I need to control as many variables as possible. And to do that I draw on a strong knowledge of fundamentals and shoot in manual mode to control as much as possible. With a solid knowledge of the fundamentals and use of manual mode I can achieve crisp, clean, sharp portraits if I want them. If I want a light hearted candid portrait with a hint of motion I can achieve that, too.
Final Frame
I love it when a light bulb goes off over a student's head. It's even better seeing their photo skills develop after a course.
Take photos. Have fun.
More about apertures and shutter speeds
Aperture is like the pupil of your eye - it allows more or less light in by getting bigger and smaller.
- Small numbers (f1.8, f2.8, f4) = large aperture = minimal depth of field (a small range of the photo actually being in focus).
- Larger numbers (f11, f16, f22) = small aperture = large depth of field (a large range of the photo being in focus).
Shutter speed is like the curtains in your bedroom. The amount of light that enters depends on how long the curtains are open.
- Larger numbers (2 seconds, 1s, 1/2s, 1/4s sometimes displayed as 2", 1", 2, or 4) = long shutter speeds = blur and panning.
- Small numbers (1/500 second and 1/1000 second sometimes displayed as 500 or 1000) = fast shutter speeds = freeze many moving subjects.