Exposed! :: Mastering advanced motion techniques ::
© Copyright 2009. All Rights Reserved.
Contents
I was the kid who liked doing everything... faster. Skiing, running, biking were always better at high speeds in my invincible youth. I still have fun on bikes and skis but it now often includes a camera. Through much trial and error (ahem - mistakes are needed!), I discovered that giving the illusion of speed or motion in photographs can often be captured while moving slowly and safely!
In last year's article "Catching Superman" covering the basics of motion photography, you learned to freeze the caped crusader in full flight or add some fun blur or panning effects to make Superman shine.
It's time to pump up the fun once you have mastered the basics of motion photography. In this edition of Exposed! we learn some of the advanced techniques that have done well for us at HarryNowell.com
Basics of motion
A quick review...
 |
 |
 |
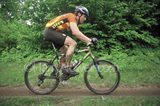
- Frozen or implied motion -- freezes any action as long as you have a fast enough shutter speed. 1/500 or 1/1000 often works well for bikes, runners and many skiers.
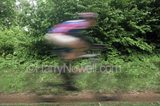
- Blurred motion -- requires a still camera on a tripod and a relatively slow shutter speed such as 1/15th of a second.
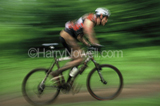
- Panning -- uses a similar shutter speed and steadyhand as you track your speedy subject with your camera.
The Fun Begins
 Once you've mastered the basics, it's time to flex your creativity.
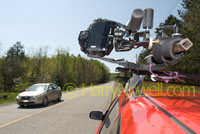
Traditional motion photography dictates the camera is attached to the earth as the bike whizzes by, offering us the perspective of the bystander.
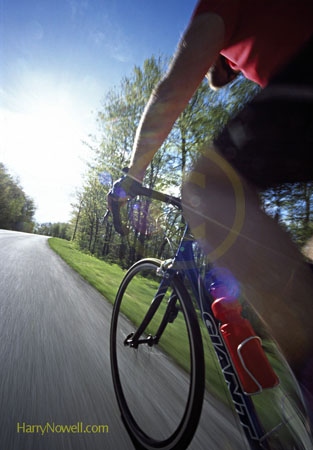
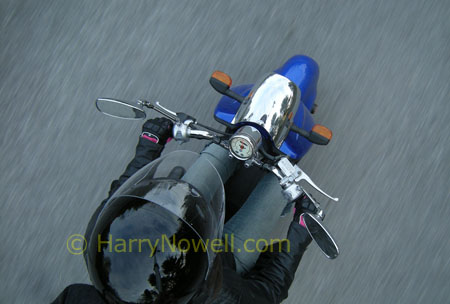
What happens, though, if you attach the camera to the item doing the whizzing? The bike appears stationary and the earth appears to whiz.
I started playing with this idea many years ago and have had considerable success in the sales department.
What's involved?
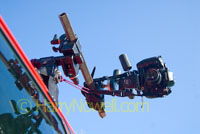
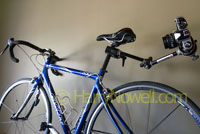
First you need to develop a big rig to attach your camera to your whizzing subject. I have had good success with Manfrotto products to help take the show on the road. I use Superclamps, steel bars, tripod heads and sometimes a Magic Arm to make the jump to hyper drive.
I will often use a series of Super Clamps and a steel bar to rigidly attach the camera to the mobile set, see below. The rig needs to be rock solid - if anything wiggles or vibrates you can generate blur in unwanted places. I prefer the steel bars over the Magic Arm for anything over 10km/hr or rough surfaces. Why? Steel bars are stiffer than a Magic Arm and produce better results.
My camera of choice? I will often use a film camera because (1) they are inexpensive, (2) they are often very light (Nikon FM2), (3) there is less to go wrong in the event of impact.
 |
 |
 |
Safety first! Always, always consider safety - what's your worst case scenario? A failing rig can lead to busted cameras, bent cars and dented heads. Use a 'redundant system' - ie if the rig fails there will be a backup system of static climbing cord to prevent flying cameras and injured people.
The Process
- Develop an idea
- Spend some time building a rig to get the appropriate composition - this is often the hardest part.
- Check the backup system and test the gear
- Evaluate the exposure
- Get out there and start shooting
Speed
With appropriate shutter speeds there's little need to actually go as fast as the photo looks. Most of our photos using this technique were done at boringly slow speeds. Looks can be deceiving!
Pro Perspective
Follow your passions and you will have a greater chance of success. I grew up skiing, running, cycling and loved the feeling of flight I got from going fast. Combined with a passion for photography and a background in business, I pursued a career in photography - my early specialty? - sport imagery portraying motion.
With many, many hours of professional daydreaming (some call it research and development) I started producing some fantastic imagery. I landed my first agency after the President of First Light at the time commented mine was some of the best kayak imagery he'd seen.
Since then, photos using motion, however subtle, have been among my strongest sellers.
Homework
- Test your skills by practicing basic techniques of motion photography.
- Ready for more? Drop into daydream mode - let your ceative juices do some work - look at pro photo web sites, sport magazines, etc.
- Start attaching cameras to slowly moving subjects - shopping carts, tricycles, etc. Remember - safety first. Using mechanical film cameras or old equipment is adviseable!
- Evaluate results - is there sharpness somewhere in the picture?
Looking for help? Consider our Sport Sessions Photo Challenge
Final Frame
Experiment with slow shutter speeds and soar with Superman.
Take photos. Have fun!
